Do-It-Yourself Materials for ABA-based Lessons
For the free lessons we provided in our ARIS Emergency Home Autism Education Program we have included a variety of photo cards that you can download, print and get started with, including: Nouns, Occupations, Emotions, Sequencing and Verbs. You can see that many lessons reference specific Stages products, which you may not have access to. This information is designed to help you source some of these materials yourself so you can expand the content you teach in each lesson.
Photo Sources
Take your own pictures
1. Take photos yourself with your digital camera or cellphone, then print them up on a home color printer or at a photo print shop. CVS and RiteAid both have this service. You can upload your images online and then pick them up in an hour. If you are unable to leave your house, amazon also has a photo printing service.
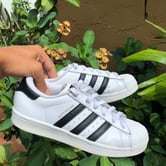
2. Minimize background distraction
 Is better than
For the picture on the right: Is it shoes? A hand? A plant?
3. Natural light is the easiest way to get a good picture. Use what is called "open shade." You want an area not in direct sunlight, but with sun very close. A good example is when the sun is blocked by a building wall rather than a patio cover.
4. You can crop and adjust photos easily on your phone, so the original shot doesn't have to be perfect.
5. Don't be overwhelmed. Of course this is time consuming, but you don’t have to take all the pictures in one day. If your child is learning to label noun pictures, they might not learn more than a few words a week. If they are learning the words more quickly, then perhaps you can use less formal ways to teach the vocabulary, such as picture books or tablet apps.
Use an online stock-photography site
1. iStock: They have flexible plans where you pay a somewhat-low monthly fee (like $29) and you can download 10 images. Or you can pay a bit more for more images.
2. Shutterstock: has similar pricing plans, but also has a one-month-free option, which might be just what you need right now.
3. Adobe Stock: again, similar pricing, but also has a trial plan. You can also get Adobe Creative Cloud with PhotoShop on a trial basis, which may be helpful in editing pictures.
4. Pexels: FREE
5. Unsplash: FREE
6. Pixabay: FREE
7. Pikwizard: FREE
Why would anyone use one of the paid sites rather than the free ones? It generally has to do with the rights to the images. You don't need to sell these, so you should be ok. Also note, Lesson 14 requires 2 identical pictures and Lesson 16 requires multiple pictures of the same item. So, it is a good idea, if your child is at this lesson-level to print duplicates and maybe take pictures of a few different shoes, cups, chairs, etc.
Share
A number of families will often get together and purchase card as a group. You can then share the cards, as all of your students won't be learning the same words at the same time. Do you belong to a parent support group? Someone in your group may have a set of cards already that they would share, or perhaps give to you if their child is done using them.
Sources for the Manipulatives Mentioned in the Lessons
Several of the lessons mention the use of 3D objects such as toy foods, animals, vehicles, blocks, etc. Lesson 12 for example requires two identical objects from several categories. To start, things like matching cups, bowls or plates (plastic is a good idea... ok... a must), or silverware work really well. Then you can move on to some of your child's toys. Do they have two matching toy cars? Two plastic horses? You want to use common objects that you will be teaching the name of later. For the plastic foods, our 3D Matching Food Kit actually uses the kind of foods that they use in house staging or furniture stores. It is the most realistic I have seen yet. You can find these on.... wait for it... yes, on Amazon. You will need 2 of each.
Lesson 13 asks the student to match the 3D object to the picture of the object. You can refer back to the photo sourcing section, and take your own pictures for this one.
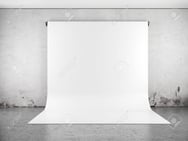
Two of the Lessons (53 & 63) require blocks, and Lesson 63 requires pictures of blocks. You can use any blocks you probably have around the house and take pictures of various structures from 2 to 20+ blocks, depending on your child's progress. It's actually kind of fun. My best tip on this  one is to tack a white sheet to the wall, and let it drape onto the floor so the effect is something like the image at right.
Lesson 92 asks you to find "sorting bears." You may already have something like this. They are also relatively inexpensive on Amazon. And again, you can get together with a group of parents, buy these together and share.
All of the Fine Motor lessons require activity sheets. These are provided in the abbreviated manual that we provided.
Wrapping up
It may take a little extra legwork, but you can pull together all of the materials to accomplish the lessons that we provided. I can't overemphasize the value of sharing the burden. We have created a community for parents and educators called the Autism Learning Line, where families can share stories, support each other, and list materials that they have to trade and share.
We are committed to providing as many free resources as possible to families, and we will add more links regularly.
If you have any questions, comments or suggestions on sourcing materials, please enter them below. We can all benefit from hearing what does and doesn't work.

Angela Nelson, J.D., Ed.M.
Angela Nelson is the creator of the widely-recognized Language Builder Picture Card Series, and the creator and lead author for the Language Builder ARIS curriculum. Angela received her BA and JD from UCLA where she studied and practiced behavior psychology under Dr. Ivar Lovaas, and her Ed.M. at the Harvard Graduate School of Education, with a focus on technology innovation and education. As Founder and CEO of Stages Learning Materials, Angela has created autism, special needs and early childhood curriculum products since 1997. In addition to her duties at Stages, Angela writes for multiple industry publications and is Chair of the Education Market Association.


